Thursday, December 22, 2011

Last Christmas present, done! (Now to wrap)

I'm finally done with my last Christmas gift.  This one is for my 4 year old niece, Bailey.  I love my nephews but since marrying Zach I can finally buy (make) girly stuff!!!  I was inspired to make this from a recycled pringles can post, which I thought I favorited, but can't find now. Its really almost nothing like the original tutorial, so whatevs.  Here goes:

This is the final product. A 3 tier, rotating tree house/treasure trove/etc tower.
 There is a dowel going through the edge of each of the layers, so you can rotate each section out and "open" it.
 One layer is a bedroom for froggy, complete with hand-sewn mattress and pillow. I've been doing a lot of sewing lately.
 Top level holds stickers right now. I'll let Bailey add whatever she wants.
 Middle layer is currently for jewelry and a tiny panda I found. I'm sure Bailey has lots of her own little treasures to store in this thing, so I didn't really want to fill it up with stuff.
So here's the tutorial part. (Sorry no pictures.)  1) Go to Michaels and find the section where the unpainted wood and paper boxes are. Here I bought these 3 little cylinder boxes for 1.99 each. (They are like 4"x3"? Around that size.  Buy a dowel if you don't have  one at home (I did.)  I took 2 of the 3 lids that came with these guys and glued them together to form the slightly large base. I filled these with rice and glue to make it heavy enough to deal with 4 year old play. I remembered to leave a hold for the dowel and glued that in as well.  When that was dry and sturdy, I covered it with paper and mod podge.  Then I decorated each box as I liked.  My paint colors (and paper) weren't too hot until I decided to cover each box with mod podge as well...then the purple layer just POPPED and I love it!  I also tried to decorate with puffy paint before painting the colors on (middle layer) for texture...but I'm a bad puffy painter. Oh well -- if I could puff-paint columns and such, I would have, and they would have been awesome. Okay so next I cut a layer of stiffened felt and put it in the base of each circle/cylinder box thingy.  I also cut the hole for the dowel. I also cut my dowel kind of tall so the top level wouldn't bounce around so I had to cut a hold in the top lid as well.  The dowel sticking out was kind of ugly so I added a flag.  Overall this project was really fun and if I would love something like this as my own jewelry stand!!!

The pringles re-make list had you 1) slicing the can into sections and adding your own bottom to each section, 2) using a dowel in the base and then gluing a straw to the outside of each section and stacking each piece by running the straw through the dowel.  I thought my method was more sturdy.

Likey? Think Bailey will like? Wish you had your own (maybe with a better color scheme?! haha)

Monday, December 19, 2011

Christmas Mantle!

Due to a trip to Scotland (where I nearly got snowed in) I had a late start on my Christmas decorating this year.
Unpacking our boxes I realized I have a lot of snowmen things...I mean a lot! Don't get me wrong, I love snowmen (and they conveniently provide decoration through at least February!) but I think I'm going to start looking for more nativity themed decor.

Remember my cheap-o Target star and spray painting project? Love it. Oh, and those 2 ceramic snowmen are salt and pepper shakers some gals and I painted at my bachelorette party.
More clearance snowmen from last year...and my "D" letter has gotten a remodel...love spray paint!
Lastly, the wedding centerpieces I never had...Not that I didn't like mine, but I did like the look of cranberries floating in water. Not that this picture and lighting does it any justice, thats for sure. These are sitting on a $.50 floor tile from Home Depot that I spray painted (and a little cork board under that to protect my table.) Loving the floor tile "coaster" and will have to work that into more things in the future. I think I can use it as a trivet, even...maybe?

Saturday, December 17, 2011

Christmas Craft: 5 minute Wreath (Ok, 15)

Every year, I see a wreath or Christmas craft idea but it is usually too late. Like last year, I made the ornament wreath, which apparently didn't make the blog but was those fragile circle ornaments hot glued to a hanger. That was fun, but a lot of glue, and very fragile results. So 2 years ago I purchased the ornaments at 90% off, so at least the idea only cost around $3 to make. I trashed it when the season was over.

Then last year I saw this other idea, making a wreath out of cookie cutters. But I already had my other ornamet wreath! Dilemmas. After Christmas I found these again for some ridiculous clearance and boxed them away for this year.

Enter: 5 minute wreath (That really took much longer.)

First of all, take off the price tags right away. Mine were very stuck after a year in the garage. I tried soaking the cutters in water, which just made them rusty. So I settled for carefully arranging them such that the price tags didn't show.
Then I glued.  And it was finished. 

And I decided that I actually DIDN'T want to see those price tags, so I spray painted it red.

*Instant love*

In hindsight, it would have been cool to paint these both red and green before glueing them. The wreath isn't perfect - you can still see the price tags through the paint if you look hard enough - so this wreath is out on the front door where hopefully the lighting will be bad enough no one will notice. The wreath itself is a little thin...not sure how I could have made that better except to jumble the cutters all over, but, then you can't see the shapes.

So what's the verdict...for the $5 that this cost, should I store it a year in the garage, or toss it and hope for new inspiration by December 2012???

Friday, December 9, 2011

Eggs and Noodles: Family Recipe

The meal entitled "Eggs and Noodles" is a Davenport traditional meal. Actually originally a Doscher meal, invented by Zach's grandfather, Poppi.  The original recipe included....wait for it...EGGS, and NOODLES. (And butter.) 

In our neck of the woods, we make this recipe in our usual manner: add everything from the fridge.  Here in a large skillet, we browned mushrooms, zuchinni, carrots (hey, they were already chopped up), peppers, onions, and corn. To this we added some leftover cooked bacon and a chicken strip. Then we let it wait in a bowl so we could re-use the skillet. This is probably around 3 cups of cooked veggies.
 While we were browning the veggies, we were also boiling half a bag of egg noodles. Have you ever tried taking pictures of steaming food? Not easy. So no pictures of that. After the noodles are almost done, they get drained and go into the big skillet with a hunk (2-3 tablespoons) of butter. This stage crisps the noodles, so don't be shy about giving it time, or a little more butter if you need it.
 Then we pile the veggies back in, and pour in 5 scrambled and seasoned eggs. We let the egg mixture cook onto everything.
 Devour.
Let me know if you like it!

Monday, December 5, 2011

Eating in the UK, part 17

In honor of my current trip in Scotland, I bring to you: Items I Could Buy At The Store, If Only I Wanted To:
Exhibit A: Port, Cheese, and Pickle pies.
 Exhibit B: Sticky Toffee Apple...Cheese
 Exhibit C: 5 Counties Cheese. In this case, this was actually my dinner. That is 5 varieties of cheese all lumped together in one block that would be a lot prettier looking if I wasn't using a cell phone camera.
 Along the same note, I'd love to try this recipe, if only I could interpret the recipe. The words are in English, but they make NO sense. Caster sugar? A punnet of rasberries?
 Lastly, if you are shopping for me for Christmas, don't forget this is on my Christmas list: Will and Kate barbie set, retailing in shops far away from you for the bargain price of 100 pounds! Converted, that's a steal of a deal at $80 per barbie! HAHAHAHAHA.
Enjoy...

Thursday, December 1, 2011

My Favorite Post of the Year!! Christmas Cake Pops!!!

I am calling this my favorite post of the year, and I really have to think that its true. I thought the burlap owls may have been close, but one bite of these tasty decorated treasures and a bunch of glue and fabric means nothing to me.

So: Cake Pops. Alternatively titled: How to make something that takes way longer than you planned, but is still way, way, awesome.

If you're gonna make cake pops of any kind, google for info. There are like a billion ideas, most of the professional ones very cute, and lots of amateur pictures out there too.  I think ours turned out somewhere in the middle.

First picture is some prep work while our cake is baking in the oven.
 More messes in the kitchen.
 Once the cake had cooled, we dumped it into the mixer with a generous portion (maybe 1/3 of a can) of frosting.  Don't hate me for using a box cake and canned frosting. I'm telling you it tasted like heaven.
 Add enough frosting to get a consistency you can shape with your hands.
 One box of cake mix made 24 decent sized balls.
 Get really into what you are doing and forget to take pictures until you are almost done. (This step is crucial.)
Side note at this point: Do not be cheap about the melting chocolate you choose to use. We lost 2 cups of chocolate chips, which I have a love/hate relationship when melting, and ultimately ended up making emergency frosting with unsweetened baking squares. It worked out well, but, was stressful. I had white chocolate squares specifically for baking (or you can use candy melts) for the snowmen, and like I said we made a chocolate frosting for the rest. (1 square unsweetened chocolate, melted. Add 1 TBSP milk and 1 cup powdered sugar. Add more of each if its too runny. Thank you again, allrecipes.com)

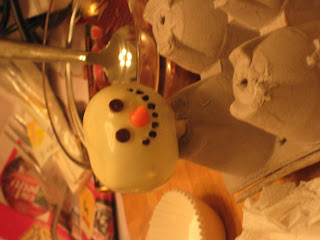
Get creative with what you can decorate with in your kitchen. We dyed white chocolate and piped these noses. Mini chocolate chips for the eyes, oreo crumbles for the mouth.
 Beth is one of those amazing crafty friends who always turns out beautiful creations. I like having her around because she gives me good ideas about how to improve what I am making. Here she is displaying her ornament, snowman, and one reindeer.
 Here's my favorite reindeer - this frosting was a little thicker, so his head has a bit of texture.
 Here's my motley crew - 3 reindeer and a tree. I love little reindeer personalities. (Are you making fun of me for personalizing cake?)
 Here is Jen's snowman. She wanted to do a double decker one and we weren't sure if it would hold up on a stick, so he just sits (later in a cupcake liner.)  Notice the mess-up behind him. That's code word for "we can eat this one as a taste test. For breakfast. No joke.
 I had quite the refrigerator of creations, between 3 gals and 24 cake balls. The egg cartons weren't really up to snuff for holding the cake pops, so we had to improvise with cardboard, straws, etc...this might have been one of my favorite parts, if not for all the other wonderful parts of this day!
 Another close up of Beth's treats, with a better view of the hat. (Those were mind oreos, we used the cream inside (trimmed down) to attach a rolo (upside down) to make the hat.
 These are Jen's treats getting a rest in the fridge.
 The next day I found some foam and we displayed Beth's again with a little more formality.
 Here is one of the most important bits: These cake pops hold up well during consumption! Here you can see the cake pop stayed on the stick.
 Even more importantly, it was delicious.
So please, I am begging you, come over to my house so I can make these again. Any excuse works. HURRY!