Showing posts with label homemade. Show all posts

Saturday, December 1, 2012

Sewing for Baby

As you know, I recently became enamored with sewing.  Being in the phase of life where all your friends are having babies, I thought it would be cool to figure out how to hand-make some gifts.

I started with burp rags, because who cares about straight seams when barf is involved? Not me. And not these recipients, I hope! 

I bought "snuggle flannel" at the fabric store, plus terry cloth material for heavy-duty backing (my sister was a super-spitter-upper) and also some fuzzy soft chenille,

 At the suggestion of my barf-blanket-sewing buddy, I also sewed some flannel-on-flannel.  The toughest part for me was matching fabrics. I really struggle with that.
 For the most part, I sewed these together first with the wrong sides out, leaving a hole, then flipping them and doing a finishing stitch around the outside.  If I had a more advanced machine, I probably could have done the flannel-flannel ones with a single strong zig zag stitch around the outside.

Also, a cute homemade baby gift could be a set of clips designed to keep a pacifier or other toys attached to the baby or stroller.  They sell the clips (for suspenders) and $3.49 for one or 2 total clips...but...if you walk a little further in the craft store to the supply section - here are 4 "straps" meant for holding your ironing board cover on -- but ultimately, its a clip and some elastic - for just $4! you could make 4 "clippies" with this package! Actually, if you attach the clip to the pacifier with a hair tie or something instead (loopy elastic) then you could actually make 8 gifts with one package.  This is one of my 2013 project goals.

Sooo...anyone having a baby I can sew for???

Saturday, November 24, 2012

Baby Gift: 12 months of Onesies

Recently I embarked on one of my largest projects yet. (The other one is a Christmas present I can't post since the recipient is a reader...and it is not even close to being done!)

For baby shower decor, I wanted to make 12 months of baby onesies.  Actually, this little gal's mom is a big scrapbooker, and I thought having a special outfit for each month would add to the scrapbook cuteness.  

I should warn you, this project is not for the faint of heart.  It was easy at the end, but I went through a lot of indecision getting to that point.  Mostly because I can't match fabrics and I wasn't sure how fast this little baby would grow (9 month onesie at 11 months? 12 month?).

Finally, I just used bibs (pre-made) to bridge the onesie size gaps. I got mine inexpensively at Ikea although initially I had hoped to make them myself. (2013 project.)

So first I picked out some fabrics relevant to the baby's nursery theme: lady bugs.  Actually - I had already purchased the onesies.  The white onesie's were from Target multi packs. (I later learned you can buy these packages at Jo-Ann's using a coupon! For future reference.) The 0 and 1 month are from a newborn package - I am HOPING this baby still fits a newborn size at one month!!!!  The 12 month is also a more elaborate onesie to celebrate big first birthday. 
 Because the newborn onesies were not from a Gerber white pack, I had to be a little more creative with the numbers (to cover up the designs already printed o the front.)  I agonized over the fabrics matching or not and ultimately decided "cuteness" was the most important thing and really, in the pictures, everyone is going to look at the babe's face! Although I do like the concept of this 1 month look - circle background with the number in the middle.
 The 12 month is my favorite!!!
 Some more months
 All together now:
 Oops, forgot to tell you - these are all ironed on with Wonder-Under.  If this were for long-term wear, I might have added some stitching to reinforce them a bit, but I think they'll be OK for their purpose.

Next time I do this project (if ever) I'm going to streamline my fabrics and do something similar to what I did for month #1. Just to make it easier.  I'm not saying I don't love these - I really love them and I think they turned out really well.  (Ok...that 2 month bib might dwarf the baby, hope she is a drooler and needs it...but you can also strategically use it on her 2nd bday).  Cant' wait to meet this little recipient!!!!

Thursday, November 15, 2012

Its time for Fall! {YUM}

We had a smidge of brisk weather the other day and I quickly forgot the 105 degree temperatures of summer and immediately started to complain about the cold.  What can I say? I am weak.  Anyhow, I am excited that soups are now back in style for supper, now that it is cooling off.  Recently we had our favorite tomato soup (recipe here) and knock-off Red Lobster cheddar bisctuits (from here). YUM.


What are you cooking now that it is cooling off????

Tuesday, November 13, 2012

The time of year where I post a whole bunch (before I disappear again)

I haven't had much to write lately. I thought my life wasn't interesting enough to write about. What was interesting, I instagram'd. (Follow me there! I'm kind of obsessed!)  But, I went through some pictures and decided, I really might have a few interesting things to post for the 3 readers left who still have me in their blog reader, plus my Grandparents, who read occasionally.

So here I go again!  Today's post is just about a really simple gift bag re-do.  This is actually a Banana Republic bag (and it was printed on the bottom of the bag.) But I have a bit of an obsession with saving handle bags and not so much an obsession with re-using them, so I'm trying to get in the habit of actually USING the things I "collect" so I don't become a hoarder.

So I had some cute black and white fabric that already had some iron-on stuff on the back. (Extras from another project to be posted soon.)  I peeled off the back of the Wonder-Under (I got mine at the fabric store for a couple bucks a yard) and then just easily ironed onto the bag, applying pressure for about 5 seconds (shorter than for ironing onto fabric.)  I had to quickly re-open the bag and make sure I didn't burn the rest of the paper bag, but it seems pretty secure.

 After that, I took a couple of painted wooden decals (From Jo-Ann's, abotu $.50 each) and glued them on either side of the bag, just to make it look a little more festive.
I'm having a bit of trouble with this second picture, but its the back of the bag (same bottom fabric, and a ladby bug embellishment instead). 

The whole project took 5 minutes and I spent $1 to make a cute gift bag.

Sunday, June 3, 2012

Sew, anything new with you?

I took up a new interest in the last 2 weeks. I borrowed my Grandma's 80's (70's?) sewing machine to see if I could figure out how to use it and if owning one of my own would be worthwhile.  I started by reading the the manual far more diligently than usual...checking the name of each part/knob/dial on the machine.
 Luckly for me, there was already a threaded bobbin (not that I realized what "bobbin" meant at the time), although the thread was black and my sewing thread was white...it did help me learn how the 2 threads work together.  Oh and also, having young 31 year old eyes, I poo-poo'd the light bulb that has a power switch while going along this process.
 However, the foot pedal didn't seem to work. No worries, I hand cranked it and saw some pretty straight stiching going on on the top of my scrap fabric. I JUST SEWED A STRAIGHT LINE!  Then I turned it over and saw this:
OOPS.  Ok so I guess the power switch controls not only the lightbulb but ALSO the foot pedal.  (Despite learning the name of the "light/power switch" it took me a while to learn this lesson.)  Flash forward about 30 straight seams later, and I was loving the machine.

Then I *gasp* ran out of bobbin thread. Rereading the manual I figured out what this meant, realized the value of a bobbin (whoops may have thrown some of those away previously..."who needs these microscopic spools of thread when I have these giant spools?"  Go ahead - laugh - this really happened!!!) Back the the machine manual...I almost had to resort to Google, but I finally figured it out.  So exciting!!!

Anyhow since then, I've practiced a few more nights. I just made 18 cloth napkins out of 2 large tea towels and actually managed to make most of the hems look pretty good! And it only took an hour of sewing. Pinning was done while watching TV. (Only a "good" example is shown below.)  Now I'm not trying to go super crafty in the sewing department...I really just want to start using cloth napkins and to save money on paper napkins and paper towels.  
Anyhow, it is nice to be more comfortable with a real live sewing machine and have something to do while Zach was gone with the reserves.  If only it did not make my back hurt so much! Any other sewing stories out there?

Monday, April 2, 2012

Beth's Bridal Shower pics

I promised some more pictures from a shower I helped throw last week and I finally got them! I was in charge of favors (which ended up being an in-shower craft) and desserts.
Here is a picture of the towel cake we made for Beth. (I think I already posted about this.) The theme of the shower was Paris/Purple/Butterflies and the gal in charge of decorations did AMAZING! I don't know where she found everything but it looked amazing.

 Here are the beginnings of the sugar scrub craft...
 Here are the spoons that we tied to the top (yes, the old ice cream cup kind!) embellished with lemon slices (for honey-lemon scented), lavender (lavender and lavender-thyme) and just some button ones because I thought they were cute.
 I wrote up some instructions (which are long since in the garbage, so hopefully I don't need to do this again!)
 And, because I can't sort pictures well when I blog, here is dessert #1: Chocolate mousse heart cups.  Delish.  The mousse is made with cook and serve chocolate fudge pudding (made with whole chocolate milk and using about 1/3 less milk than the recipe) plus equal parts heavy whipped cream. Put into chocolate heart cups (never going to make those again...at least not 100ish of them)
 And we also had lemon flavored...delish!!!
 The other dessert was brownie pizza. This represents 4 portions...got cut up after the photography session. 
 Both of these ideas were mostly inspired by pinterest, of course.
Oh, and here is the final product, someone's hand scrub:

Thursday, December 22, 2011

Last Christmas present, done! (Now to wrap)

I'm finally done with my last Christmas gift.  This one is for my 4 year old niece, Bailey.  I love my nephews but since marrying Zach I can finally buy (make) girly stuff!!!  I was inspired to make this from a recycled pringles can post, which I thought I favorited, but can't find now. Its really almost nothing like the original tutorial, so whatevs.  Here goes:

This is the final product. A 3 tier, rotating tree house/treasure trove/etc tower.
 There is a dowel going through the edge of each of the layers, so you can rotate each section out and "open" it.
 One layer is a bedroom for froggy, complete with hand-sewn mattress and pillow. I've been doing a lot of sewing lately.
 Top level holds stickers right now. I'll let Bailey add whatever she wants.
 Middle layer is currently for jewelry and a tiny panda I found. I'm sure Bailey has lots of her own little treasures to store in this thing, so I didn't really want to fill it up with stuff.
So here's the tutorial part. (Sorry no pictures.)  1) Go to Michaels and find the section where the unpainted wood and paper boxes are. Here I bought these 3 little cylinder boxes for 1.99 each. (They are like 4"x3"? Around that size.  Buy a dowel if you don't have  one at home (I did.)  I took 2 of the 3 lids that came with these guys and glued them together to form the slightly large base. I filled these with rice and glue to make it heavy enough to deal with 4 year old play. I remembered to leave a hold for the dowel and glued that in as well.  When that was dry and sturdy, I covered it with paper and mod podge.  Then I decorated each box as I liked.  My paint colors (and paper) weren't too hot until I decided to cover each box with mod podge as well...then the purple layer just POPPED and I love it!  I also tried to decorate with puffy paint before painting the colors on (middle layer) for texture...but I'm a bad puffy painter. Oh well -- if I could puff-paint columns and such, I would have, and they would have been awesome. Okay so next I cut a layer of stiffened felt and put it in the base of each circle/cylinder box thingy.  I also cut the hole for the dowel. I also cut my dowel kind of tall so the top level wouldn't bounce around so I had to cut a hold in the top lid as well.  The dowel sticking out was kind of ugly so I added a flag.  Overall this project was really fun and if I would love something like this as my own jewelry stand!!!

The pringles re-make list had you 1) slicing the can into sections and adding your own bottom to each section, 2) using a dowel in the base and then gluing a straw to the outside of each section and stacking each piece by running the straw through the dowel.  I thought my method was more sturdy.

Likey? Think Bailey will like? Wish you had your own (maybe with a better color scheme?! haha)

Thursday, December 1, 2011

My Favorite Post of the Year!! Christmas Cake Pops!!!

I am calling this my favorite post of the year, and I really have to think that its true. I thought the burlap owls may have been close, but one bite of these tasty decorated treasures and a bunch of glue and fabric means nothing to me.

So: Cake Pops. Alternatively titled: How to make something that takes way longer than you planned, but is still way, way, awesome.

If you're gonna make cake pops of any kind, google for info. There are like a billion ideas, most of the professional ones very cute, and lots of amateur pictures out there too.  I think ours turned out somewhere in the middle.

First picture is some prep work while our cake is baking in the oven.
 More messes in the kitchen.
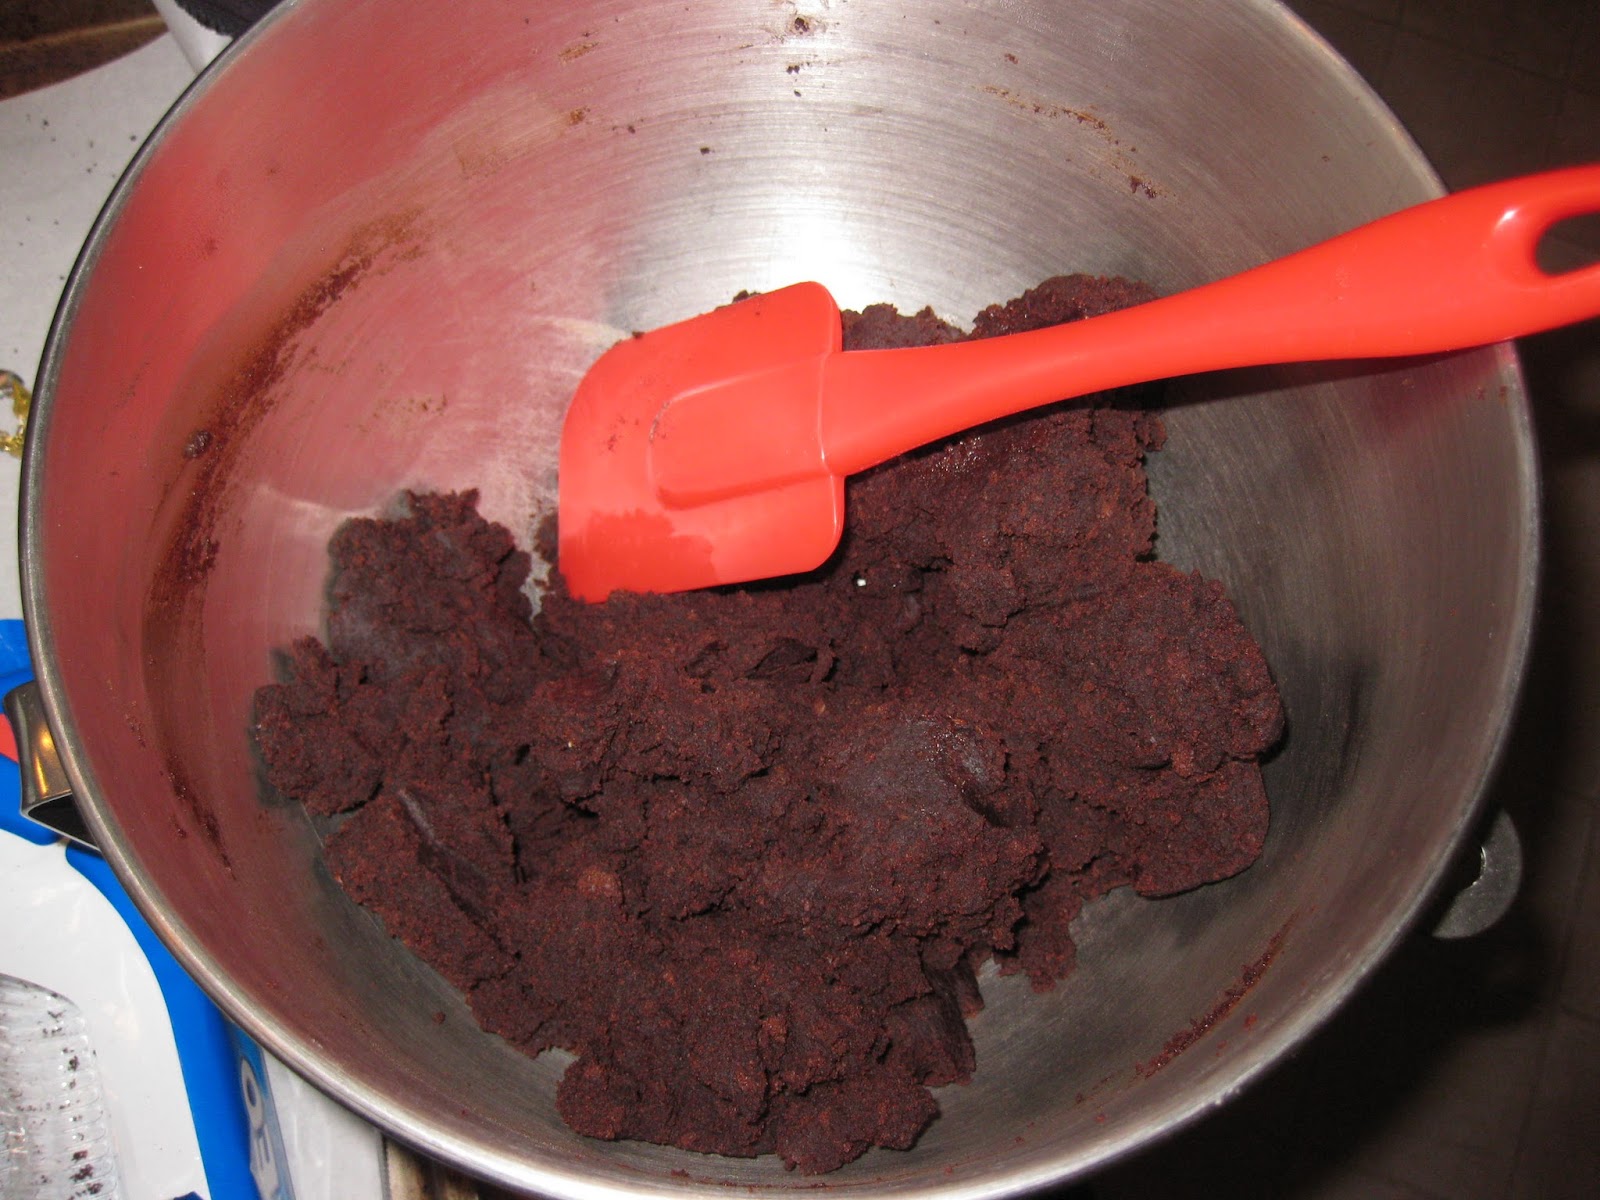
 Once the cake had cooled, we dumped it into the mixer with a generous portion (maybe 1/3 of a can) of frosting.  Don't hate me for using a box cake and canned frosting. I'm telling you it tasted like heaven.
 Add enough frosting to get a consistency you can shape with your hands.
 One box of cake mix made 24 decent sized balls.
 Get really into what you are doing and forget to take pictures until you are almost done. (This step is crucial.)
Side note at this point: Do not be cheap about the melting chocolate you choose to use. We lost 2 cups of chocolate chips, which I have a love/hate relationship when melting, and ultimately ended up making emergency frosting with unsweetened baking squares. It worked out well, but, was stressful. I had white chocolate squares specifically for baking (or you can use candy melts) for the snowmen, and like I said we made a chocolate frosting for the rest. (1 square unsweetened chocolate, melted. Add 1 TBSP milk and 1 cup powdered sugar. Add more of each if its too runny. Thank you again, allrecipes.com)

Get creative with what you can decorate with in your kitchen. We dyed white chocolate and piped these noses. Mini chocolate chips for the eyes, oreo crumbles for the mouth.
 Beth is one of those amazing crafty friends who always turns out beautiful creations. I like having her around because she gives me good ideas about how to improve what I am making. Here she is displaying her ornament, snowman, and one reindeer.
 Here's my favorite reindeer - this frosting was a little thicker, so his head has a bit of texture.
 Here's my motley crew - 3 reindeer and a tree. I love little reindeer personalities. (Are you making fun of me for personalizing cake?)
 Here is Jen's snowman. She wanted to do a double decker one and we weren't sure if it would hold up on a stick, so he just sits (later in a cupcake liner.)  Notice the mess-up behind him. That's code word for "we can eat this one as a taste test. For breakfast. No joke.
 I had quite the refrigerator of creations, between 3 gals and 24 cake balls. The egg cartons weren't really up to snuff for holding the cake pops, so we had to improvise with cardboard, straws, etc...this might have been one of my favorite parts, if not for all the other wonderful parts of this day!
 Another close up of Beth's treats, with a better view of the hat. (Those were mind oreos, we used the cream inside (trimmed down) to attach a rolo (upside down) to make the hat.
 These are Jen's treats getting a rest in the fridge.
 The next day I found some foam and we displayed Beth's again with a little more formality.
 Here is one of the most important bits: These cake pops hold up well during consumption! Here you can see the cake pop stayed on the stick.
 Even more importantly, it was delicious.
So please, I am begging you, come over to my house so I can make these again. Any excuse works. HURRY!

Saturday, November 26, 2011

Cute, Easy Ornament Idea

Happy Black Friday everyone! I'm scheduling this post ahead of time, because I think I'll be out bargain hunting on the actual day. And now the Christmas floodgates have officially opened, so I don't have to quickly switch CD's in my car to non-holiday when other people ride with me! :)

I saw this cute idea last year and actually made these then, but never gave any of them away. I got little containers of red and white buttons from Michaels.  I strung them, randomly, on some wire that I tried to form in a circle. The hardest part was figuring out the best way to hook it, and to hide the wire. I chose ribbon.  You cnan see in this photo I was only sort of successful. I may choose to re-do some of these and give them away this year.  But I also have the owls. How many ornaments can one person give away? How many friends want an endless supply of homemade ornaments?  *Sigh.*
Well, I think they are super cute. And if you're one of those crazy decorators who picks a "color theme" each year (or sometimes) this would be a cheap way to decorate your tree...and you could always re-use the buttons afterwards!

Tuesday, November 15, 2011

Looking back to October: I can (could) CAN!!

Warning: another post inspired by Our Best Bites. I am seriously going to have to start tagging them!
So, Zach has a thing for homemade McIntosh applesauce.  We tried to get some of these apples from Apple Hill, but they HAD NO APPLES! No joke! Anyhow, some friends with an overflowing apple tree saved the day.  Raw, their apples taste close to McIntoshes. 

So anyhow. Inspired to do some canning.  Wanting to use fresh applesauce during baking. Not having any room in my freezer.  Enter: interest in canning. (Also goes along well with my obsession with glass jars.)

So the Best Bites website did an intro to canning, making it not seem as scary (and life threatening) as I previously thought.  So I checked out a book at the library with some additional instructions and gave it a whirl.
sanitizing the jars

clean apples waiting to be peeled!

yum!

faithful helper!

making a mess with all the "stuff"

stockpot where jars are processing, small pot where lids are being warmed, and the cooking applesauce. Holy stove usage, Batman!

See my jar in there?

fearfully removing my jar...

First batch done!
Phew! Summary:  A little more work than I thought, but stressful because I wasn't familiar with the process.  Despite the work, though, I think the results are extremely satisfying. I'm happy with it! Next goal to can: pizza sauce!