Today I am going to show you how to make a burlap owl ornament. I also plan to possibly use these as gift tags. I was first inspired last year when I saved this Martha Stewart page, I just didn't have any burlap (
now I do!) to try it out with. Plus, one of my closest friends Jessica was visiting from Santa Barbara, so it was a great excuse to get our craft on!
I didn't bother saving the measurements from the magazine, so we just picked a can and a peanut butter container from the pantry that fit the sizes we wanted to make. We also make some patterns out of magazine paper to figure out our sizes.
Part 1: Cut out your circles!
Part 2: Cut out all the pieces! (After my first one, I started cranking these out, assembly line style!
We used regular tacky glue to stick on the wings. Note: For most of these owls, we used the stiffened felt, not just regular floppy felt.
Part 3: Add nose. Oops, forgot to rotate this pictuere. *Sorry* this is a baby owl, I can tell from the smaller nose on this particular picture. It was hard to figure out from the magazine example, but it seemed like the top of the nose should be at the top of the burlap circle. (or even higher, if you want to glue your eyes to the nose a bit.)
Then I added eyes. This picture is of the bigger owls, I can tell because miraculously the nose turned brown and long. (Notice that the Martha Stewart picture has an orange nose? Yeah, we missed that detail until we were on our last batch of owls. We thought brown and black was still OK though.) Also, here I have a lot of the eyeball on the burlap. Sometimes it is cuter to have it half off the burlap, but that makes it harder to glue on. And, you want to cover up the tip of the wing too.
So that finally, after snipping out teeny tiny feet, you get something like this:
And then you make a bunch. We expiremented with pupil size. At first small was cute, then big, finally we realized that medium size was the best overall. Shown in this picture is an even smaller (red) one because they were TOO CUTE!
Then Jessica dared me to make one as small as I could. That is the smallest little red guy in this picture. Also, these are a bunch of Jessica's owls. Note the artistic wings (one has eyebrows!) and perfect circle eyes. She does a lot better than I do!!!
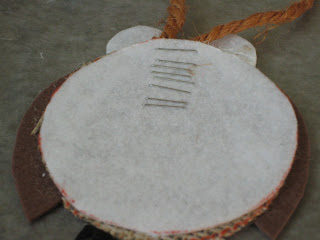
To make the owls a bit more sturdy, I stapled twine to a stiffened felt circle and glued it to the back of the owl. This is one of the first ones when I was thinking it had to be really, really, really secure...not thinking that 23 staples on the back of something is really, really, really not cute. Later I capped myself at 3 staples per backing.
From here, after glueing to the burlap owl (No, the glue did not show through the burlap holes!) I wrote little notes on sticky paper and attached them to the back. Things like, "Gloria, it was a really HOOT to spend time with you on Sunday!"
(Please send me more owl related jokes.) Then on the bottom I put, "PS: You can re-use this as an ornament or gift tag!" I wanted my reciepients to know they didn't have to keep this little guy forever if they aren't into owls or something like that.


